Free Tutorial Photoshop: How to Remove a Solid or Gradient Background from Photos in Photoshop
Free Tutorial Photoshop: How to Remove a Solid or Gradient
Background from Photos in Photoshop
An advertiser needs always to have several items to be incorporated in
his ad; it can be a piece of furniture, a logo, a model or ay similar items
than are relevant to his/her ad in order to give it a more relevant sense.
In designing sales ads for clothing stores, an advertiser, or graphic
designer, must perform a brainstorming exercise first to define what are the
objects he/she may need to use her, may need to highlight to have an expressive
story telling advertisement, perhaps we need to use a simple cartoon of a group
of ladies making purchases with buying bags in their hands, or a nice lady (or
man of course if he is making a menswear ad), but what if the advertiser found
the suitable photo for his ad but it is not available in a single transparent
background? The answer will be to remove whatever background behind it, copy
the model and past it!! I know that this is the answer actually, but what is
needed to be performed to incorporate this photo in the advertisement while
having a realistic effect, not just a cropped silly model photo that definitely
gives the feel that she is pasted on the ad and completely separated from it.
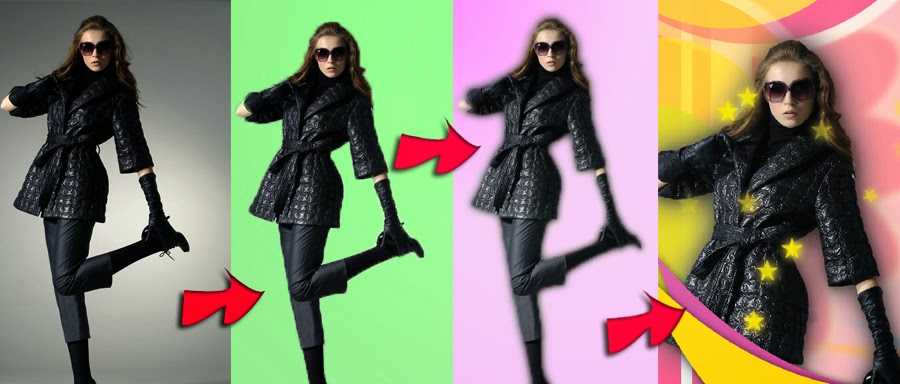
Now let's have some quick tips and tricks to remove a background from a photo
while giving it a nice look to be incorporated within an advertisement.
Layer Mask: First rule first, never cut, only mask! When you are
about to remove a background from a photo the first thing you need to put in
mind is that you will not literally remove or erase the background, of course
not, you will only create a layer mask to make in temporarily invisible,
perhaps sometime in the future you need to use the whole image or maybe remove
some parts only from the background for whatever reasons, so put it in your
mind, no erasing, only MASKING.
Pen Tool: The best tool you can ever use for masking and making a
very accurate selection of the object you wish to separate is the "Pen" tool, (press "P"
to get it) all what you need is to zoom in the Photoshop file and begin using
the Pen tool to create a path all around your object; for curves you can press
and drag until you get the exact curvature, and you can return to sharp path by
pressing "Alt" while clicking on the
curved point. At the end of your path when you are approached to the first
point you created you can see a small circle referring to closing your mask;
close your mask then, right click the path and click on "make selection", set the feather to (0) to have
sharp crispy edges, now you have a selection of your object, all what you need
is to click on the "add mask" button
to get rid of the background.
Quick Selection Tool: Press "W"
to get it; I prefer to use this tool when I have a large background with little
details, this tool can be useful with simple gradient backgrounds.
Color Selection: For solid background the best selection tool will be by
using color selection, it is the most easy way to create a selection out of a
solid color background, from the select menu click on "color range" and use the color picker to select
the background, click ok, now you have the selection of the solid color of the
background, but of course we need to make a selection of the object and hide
the background, to perform this, from the selection menu click on "Inverse", now you can click on the mask icon.
Remember this selection method works only with solid colors.
Refine Edges: A good tool you can use to adjust your selection is the
"Refine Edge" tool, you will find it
in the select menu; this tool can help you adjust (radius-contrast-smooth-feather-contract/expand)
according to your preferences, try to manipulate every slider until you get the
best results you wish to have.
Blurring Effect: Now you have a crisp defined object, but when you
incorporate it into an advertisement it can have a cliché look, blurring effect
can solve this problem, but what will be blurred will be the borders of the
object only, not the whole object; now press Ctrl and click on your layer, from
the selection menu click on "Modify"
and choose "Contract", put a small
number like 2 or 3, now from the same selection menu click on "Inverse", and now you can apply the blur effect
from the filter menu (blur-Gaussian blur). Now you will have a very smooth edge
for your object ready to be used in any advertisement.


Comments
Post a Comment